|
Home
Up
The First Awesome Butterfly
Beloved Butterfly Stories!
Beaders' Resources
Nancy's Friends Page
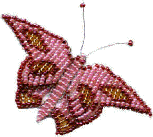 One
of Nancy's favorite Victorian wire and seed bead butterfly creations, like her
great-grandmother's original. One
of Nancy's favorite Victorian wire and seed bead butterfly creations, like her
great-grandmother's original.
Under development:
Nancy's Dazzling Dragonflies!
Shopping Cart for Nancy's Awesome
Butterflies
Email Me!
|
nancyb[at]awesomebutterflies.com |
| |
Tim's Awesome Beaded Abacus! Free Directions
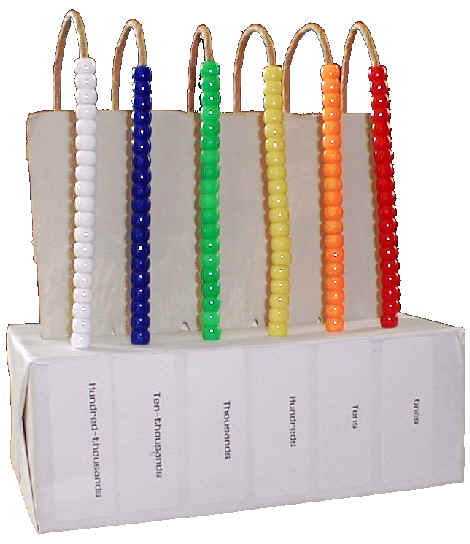 |
Supplies needed:
6 colors of pony beads, 19 of each color.
3" x 4" x 8" Styrofoam Brick
6 lengths of 16-18 gauge or thicker Floral Wire, 18" long, wrapped (shown)or unwrapped
Contact (self-adhesive) or alternative paper to cover brick
Permanent Marker
Optional: Labels, wire cutter, cardboard divider (7" x 5 1/2"), scissors for
cardboard, water-base (acrylic or craft) paint, a sharp knife, tacky or other glue. |
Directions:
1. Wrap the brick in contact paper or your alternative like a package.
2. Bend each of the six wires in the center by curving each over the edge of a small cup
or rolling pin.
3. Measure and mark location for 2 rows of 6 holes on the top surface of the brick. Make
the rows 1 1/4" apart (or 5/8" from the center of the brick lengthwise) and the
marks for the holes in each row should be evenly spaced, about 1 1/8" apart, starting
about 1" in from each end, and approximately 1 1/8" between each hole in the
row. Follow step 4 if you wish to use a divider. Otherwise skip to step 5.
4. If you want a divider (as shown), cut a 7" x 5 1/2" piece of cardboard or
other rigid material you may have.
Along one long edge, clip out several triangular sections about 1 1/4" long, with a
base of about 1/2-3/4" so that the edge resembles pointed teeth of a large sawblade.
Paint or cover the divider if desired.
Mark the center of the brick, and PARENTS: Pierce the brick slightly with a sharp knife in
the areas where the "teeth" will be pushed into the brick.
Gently push the pointed edge of the divider into the brick and test for position. Remove,
add glue to the edges, and again press into the brick as you have just done.
5. Place 19 beads of one color on one wire. Repeat with the 5 other wires, using a
different color on each wire. You may want to put paper-clips on the ends of each wire
temporarily to prevent beads from falling off.
6. Push one end of each wire into one row, and then the other end into the hole opposite
it in the other row. Avoid pushing it through the bottom of the brick.
Adjust wire for height as desired. You may make the wires shorter if desired also.
With your permanent marker or labels, mark the columns on the side as shown from left to
right: hundred-thousands, Ten-thousands, Thousands, Hundreds, Tens, Ones.
Alternatively, on the other side, you may want to place the following left to right:
Hundreds, Tens, Ones, a decimal point in the middle, then One-tenths, One-Hundreds,
One-thousandths to represent decimals.
Have fun with your new, inexpensive homemade abacus!

Free instructions are by Nancy Berntsen, owner, artisan of Awesome Butterflies,
1017 Howe Ave., Shelton CT 06484-2326.
http://awesomebutterflies.com
Email:
nancyb[at]awesomebutterflies.com
|